Reality Ride Elementary (1-2) Sample Lesson
Get Started
With the Lesson Plan PDF
Reality Ride (1-2) Summary:
The Reality Ride Metaphor Walkthrough lessons will be split into two separate lessons. In the first lesson, you will begin by doing the activity, Choose Your Path. This activity will give the students the opportunity to physically evaluate and take two different paths. The experience itself will set the stage for introducing a version of the visual metaphor for the very first time. The activity will highlight the difference between two choices, and how one choice leads to our goal and the other one will not. The one that doesn’t take us to our goal will even look more exciting to choose.
The second lesson will be separate from the activity and we suggest you do it on a separate occasion. This lesson will begin by processing the activity you did before and introducing the visual metaphor. Using the visual metaphor you will help students compare the picture with the activity and ultimately arrive at the idea that we have different choices in life and while sometimes a choice may look or sound fun, it’s important to think about what will get us to where we want to go. We also introduce the idea of Stop, Think, Choose to give students a practical strategy.
Reality Ride Lesson Elements
Part One
- Choose Your Path Activity
Part Two
- Metaphor Walkthrough
- Skill Development: Roleplay Stop, Think, Choose
- Resilience Booster: Harder But Worth It Wall
Reality Ride Vocabulary
- Choices
- Consequences
- Track
- Easy Fast Decision
- Harder but worth it decision
Reality Ride Learner Objectives
- I can explain that actions have consequences.
- I can explain why sometimes a choice sounds or looks fun, but can actually be a negative choice.
- I can identify choices that hurt me or others.
- I can stop, think, and choose when faced with a choice
Reality Ride Metaphor Walkthrough Part One
Facilitating the Activity: Choose Your Path
Overview:
This activity will help students understand there are different paths (choices) we take that
lead to different outcomes. We get to choose what path we walk each day. As the facilitator, you will set up two different paths ahead of time and then lead them down each path.
Materials:
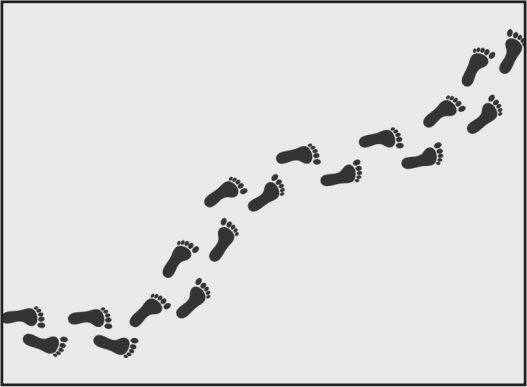
- Footprints (PDF Provided or use your own) As many copies cut out to create two different paths.
- You need to create two paths ahead of time for students to walk along
Instructions:
The teacher will set up two separate paths ahead of time using the footprint PDF provided with the activity. You print out enough footprints to create a path. We recommend putting footprints every 10-15 feet. You will choose your starting point and then create one path that represents the easy, fast path. This path should look fun and exciting and even involve some parts that may be against school rules (if you feel it would be appropriate). Perhaps it is going over playground equipment or down some stairs or areas of the building students like to play. You can be creative. However, the path will take an unseen turn and should actually lead to a wall or dead end. The second path should look like a much longer path that is also somewhat boring. This will lead to the destination. You may want to throw in some unforeseen moments along that path that are fun, but it is going to be a longer, less extreme path.
Explain to the class that you are trying to get to your chosen destination. There are two paths we can choose to take. Please point out the easy, fast path (without giving it that name) and explain to the kids roughly the route that path will take, making sure to highlight some of the exciting parts of that path. Don’t mention that it actually doesn’t reach the destination but ends up crashing or leading into a wall. Point out the harder but worth it path (without giving it that name) and explain to the kids roughly the route that path will take, making sure to point out the long route it will take.
Ask students to think about which path they would like to take. We would not recommend having them vote or raise their hands. Instead, ask, “Who would like to share which path they would like to take?” Please have a few students share which path they would like to take, and you don’t need a reason why. You will ask them why later. Hopefully you will have at least one that wants to take each path.
Explain you are going to start with the first path (easy-fast). Reinforce your classroom and school rules about walking in a line and then lead them along the path. This should be fun and engaging; however, eventually you will come take the unforeseen turn and end up at the dead end or the wall. Some of the kids in the back of the line may not realize what has happened so have the students gather around and ask the following questions:
Ask these questions:
- Did we get where we wanted to go?
- What do we do now?
Go back to the start and ask the question: “Which path should we take?” Inevitably someone will bring up the other path. Follow the same procedure and take the second path. If you had not included some ‘fun or exciting’ moments along this path that were hidden when you first introduced it, you can also stop along the way and celebrate how far you’ve come. Kids can high-five each other or do a cheer to celebrate along the way.
Eventually, the second path will make it to your destination. At your destination, you should celebrate that you reached your goal. Make sure you use the word goal to describe your destination. This can be a way to introduce the vocabulary word for the first time and explain what it means to have a goal.
Processing Questions:
- Who can remember what path they wanted to take in the beginning? Why did you want to take that path?
- Were their parts of the first path that were fun?
- Where did it lead?
- If that path always leads to crashing into a wall and never reaches your destination should you take that track?
- What was the second track like?
- Were there moments along the second track that were fun? Why did we celebrate at the end of the second track?
- What is a goal?
Reality Ride Metaphor Walkthrough Part Two
(Recommended to be done on a different day from Part One)
Walkthrough Introduction:
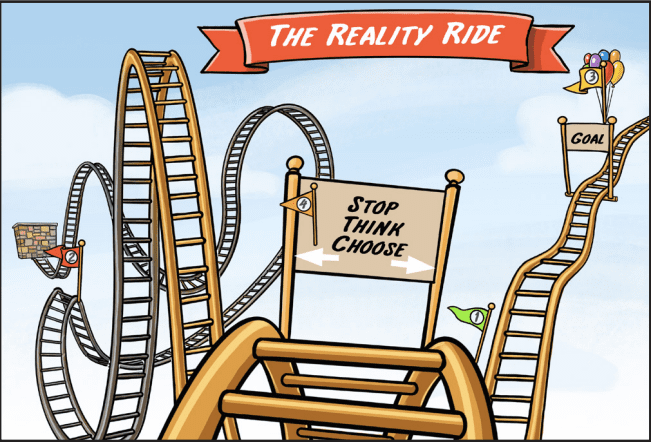
Introduction: In the activity we did together last time, we had some fun exploring two different paths. Can anyone remind us what happened? We got to walk two paths together and experience the differences! Share a few of the ideas your students surfaced from processing the activity last time. We are going to continue to talk about paths today. A few of you may have been on a special path that we are going to talk about today. Let me show you a picture!
Metaphor Walkthrough Questions and Processing
Flag One:
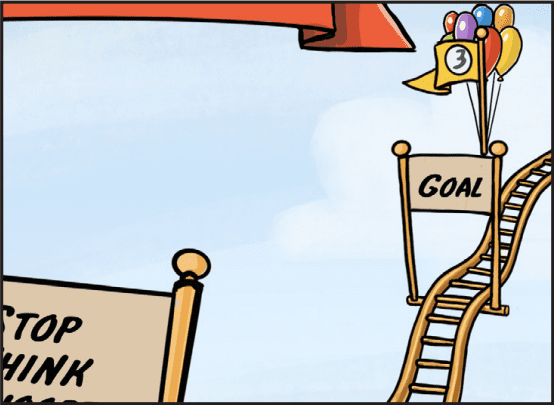
Who can tell us what this is a picture of?
(Explain this is a picture of a roller coaster. We are looking at this roller coaster as if we were sitting in the seat!)
Who has been on a roller coaster before? Does anyone have a fun story to share about it?
Explain this Roller coaster looks different than the ones you’ve probably been on because you can see instead of one path, there are two!
Flag Two:
Point to the Easy Fast track and ask: How would you describe this track? (If you think students are unfamiliar with the word track, you may want to explain to your students that a roller coaster track is like a path, road, or trail) Explain last time we did an activity that is very similar to this picture.
Questions to ask:
- How does this track compare to the activity we did where we chose paths and followed footsteps?
- Which path is this track most similar to?
- Does this track look more fun? Why?
- Where does this track end?
- If this track ends at the wall, will we ever get where we want to go?
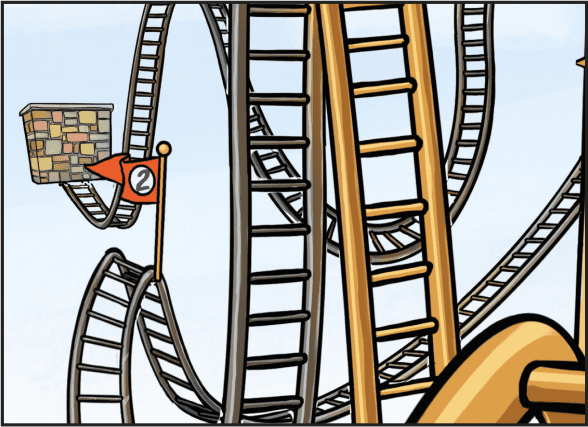
Explain that this track is what we call the Easy Fast track. Take a moment to explain that the easy, fast track is the path we take when we make an easy, fast choice. That is a choice that we sometimes make that gets us in trouble.
Flag Three:
Point to the Harder But Worth It track and ask:
- How would you describe this track?
- Where does it end?
- Explain that this roller coaster track doesn’t look as fun, but it is called the Harder But Worth It track and it ends up getting to the end or to our goal.
- How does this track compare to the second track we walked in our activity?
Explain this Roller Coaster called The Reality Ride teaches us that it is important to learn about the choices we make. Each track represents different choices we make every single day. This is what we call decision making or making choices. Today you made a choice to get up and come to school. Some choices your parents will help you make and sometimes your friends will help you make a choice. But you are the one who actually makes the choice and rides that track like a roller coaster.
Sometimes during the day, we have to decide between making an easy fast track choice that seems fun but will actually crash into a wall or come to a dead end and a harder but worth it track choice that doesn’t seem as fun but it is a choice that helps us get where we want to go.
Let’s look at an example. Choose one or two examples of relevant choices they make that might illustrate this principle. Some suggestions would be: cutting in line, goofing off in school, doing homework. Point out to your students that in each example there is the Easy fast choice and the Harder but worth it choice. Help them understand why each track represents the different choice.
Flag Four:
What can we do to help us make a choice between the two tracks that will help us reach our goals?
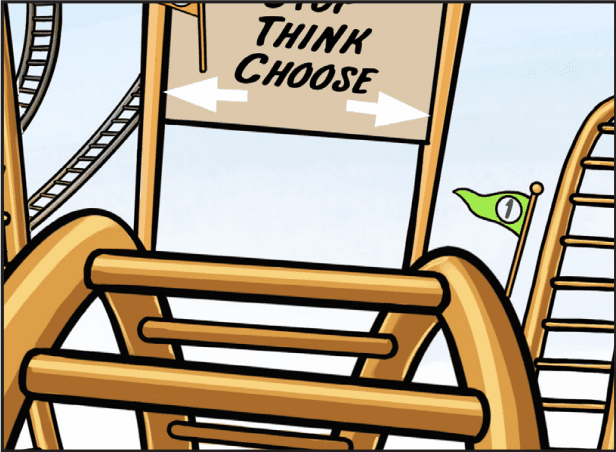
Take suggestions from your students. Their answers may coincide with the next principle you will teach them. Explain you are now going to teach them a trick to help. It is called: Stop, Think, Choose!

Let’s roleplay for a moment. Choose some students to model the story you will share. Tell a story that is common for all students: cutting in line. Set up the scenario by having a group of your students form a line. You all are waiting in the lunch line. Have one of your students stand aside. Share how that student is coming along to go to lunch and their friend, near the front, says or point with their fingers: “Come cut in line”. Pause the roleplay for a moment and explain how this moment is like being in the Metaphor Picture. There are two tracks or choices they can make. The fun and exciting one but it actually ends in a place we don’t want to go and the other one does.
Explain that butting in line is like taking the Easy Fast track because it’s the easier decision because you get to be with your friend and you get to eat lunch quicker; but point out the consequences by explaining that they could potentially get in trouble and they could also make all the other students behind them angry. Point out that the Harder But Worth It track or choice would be to go to the next spot in line at the end and wait like everyone else. They will not only get to eat lunch but they also won’t hurt feelings, they won’t get in trouble, etc. To help us make that choice there are certain things we can do. What is the first thing we should do? (hold up a sign with the word STOP). That’s right. We should stop to think about our choices. Don’t make a decision yet.
What is the next thing? (Hold up a sign with the word THINK). We should now think about our choices. We just did that together.
What is the last step? (Hold up a sign with the word CHOOSE) Finally, you have to make a choice or a decision. Turn to the student and ask what choice are you going to make?
You have learned something very important today. You have learned a very important skill called decision making. That means to be able to make choices by stopping, thinking and making the choice which will keep you on a path toward your goals. (You will want to use this language as you continue to talk with students about choices).
Resilience Booster: Harder But Worth It Wall

To finish this lesson and extend learning, you can develop a Harder But Worth It Wall in your learning space. Students will be given opportunities to add choices they have made to the wall that could be characterized as a Harder But Worth It choice. You can provide cut-outs or resources to write on. You could facilitate this once a day or week to revisit the key concepts about decision making and learning to identify harder but worth it choices.